Power Board Wiring: A Complete Guide for Beginners and Professionals
Electrical wiring is one of the most important aspects of modern living. Every home, office, shop, or industry requires a safe and efficient power distribution system. Among the various components in electrical systems, power boards play a crucial role. A power board, often known as a switchboard or distribution board, is the hub where power from the mains is divided and distributed to different devices or appliances.
In this article, we will discuss power board wiring in detail. You will learn what a power board is, its components, wiring principles, step-by-step wiring instructions, safety precautions, and common mistakes to avoid. Whether you are a beginner, an electrician, or simply a curious learner, this article will give you complete knowledge about power board wiring.
What is a Power Board?
A power board is an electrical device used to control and distribute electricity from a single source to multiple appliances. It usually contains:
- Sockets (Plugs) – for connecting appliances like refrigerators, air conditioners, TVs, fans, and computers.
- Switches – to control the ON/OFF operation of the connected appliances.
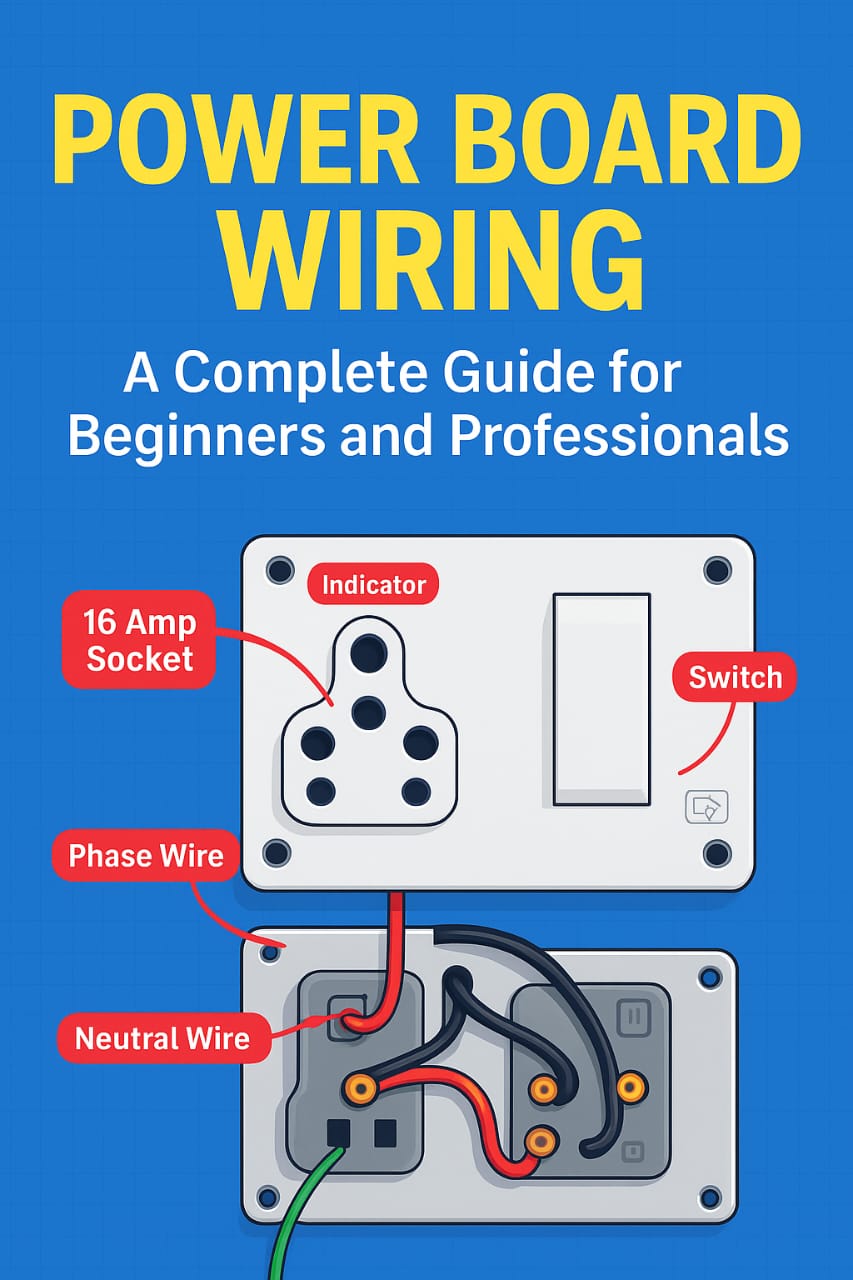
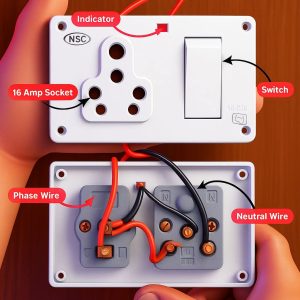
- Indicators – small LED or neon lamps that show whether the board is powered ON.
- Wires – mainly phase, neutral, and earth wires, which complete the electrical circuit.
In simple terms, a power board acts as a mini power distribution center for your room, office, or workshop.
Components of a Power Board
1. Switch
The switch is used to control the flow of current. When ON, current flows to the socket or appliance; when OFF, it disconnects the current.
2. Socket
Sockets provide the point of connection for electrical appliances. They come in ratings such as 6A, 10A, or 16A depending on the power requirement.
3. Indicator
Indicators are usually neon bulbs or LEDs that glow when power is supplied. They help you quickly identify whether the power board is active.
4. Wires
- Phase (Live) Wire – Red: Carries current from the supply to the load.
- Neutral Wire – Black/Blue: Completes the circuit by carrying current back.
- Earth Wire – Green: Provides safety by directing leakage current into the ground.
5. Mounting Box & Cover Plate
These provide mechanical support and ensure safe installation of switches and sockets.
Types of Power Boards
- Domestic Power Board – Used in homes for TVs, fans, chargers, etc.
- Industrial Power Board – Heavy-duty boards for machinery and equipment.
- Multi-Socket Power Board – Extension boards with multiple sockets.
- Smart Power Board – Equipped with surge protection, USB ports, and smart controls.
Basics of Power Board Wiring
To wire a power board, you must first understand the basic electrical principle:
- Electricity flows from the Phase wire to the appliance and returns through the Neutral wire.
- A switch is always connected to the Phase wire, not the Neutral. This ensures safety when the switch is OFF.
- Earth wire must always be connected to the socket’s earth terminal.
Tools Required for Power Board Wiring
- Screwdriver set
- Wire stripper
- Tester
- Electrical tape
- Pliers
- Drilling machine (if mounting on a wall)
- Proper gauge copper wires
Step-by-Step Power Board Wiring
Step 1: Safety First
Turn off the main power supply before working. Use insulated tools and wear rubber-soled shoes. Make sure wires are of proper rating (2.5mm² or higher for heavy loads).
Step 2: Understanding Connections
The phase wire (red) goes first to the switch, then to the socket. The neutral wire (black/blue) connects directly to the socket and indicator. The indicator is connected parallel to the socket. The earth wire (green) goes directly to the socket’s earth terminal.
Step 3: Connecting the Switch
Connect the incoming phase wire to one terminal of the switch. From the other terminal, connect a wire to the socket’s phase terminal.
Step 4: Connecting the Socket
Connect neutral wire to the neutral terminal of the socket. Connect earth wire to the earth terminal. Connect switched phase wire to the socket’s live terminal.
Step 5: Connecting the Indicator
Connect one side of the indicator to the phase wire (after the switch). Connect the other side to the neutral wire.
Step 6: Testing
Turn on the main supply. Switch ON – the indicator should glow, and the socket should have power. Switch OFF – the indicator should go off, and the socket should disconnect.
Wiring Diagram Explanation
A simple wiring diagram for a power board looks like this:
- Incoming Phase (Red) → Switch → Socket (Phase terminal).
- Incoming Neutral (Black/Blue) → Socket (Neutral terminal) + Indicator.
- Indicator Phase → After Switch (so it lights up only when ON).
- Earth (Green) → Socket Earth terminal.
Safety Precautions in Power Board Wiring
- Never connect switch on Neutral wire – it can make the appliance dangerous even if OFF.
- Always use proper rated wires – thin wires may overheat and cause fire.
- Tighten all connections properly – loose connections cause sparking.
- Always connect Earth – for protection from electric shock.
- Use ISI marked switches and sockets – to ensure durability and safety.
- Do not overload – avoid connecting high-power appliances to small sockets.
Common Mistakes in Power Board Wiring
- Reversing phase and neutral connections.
- Leaving the indicator permanently ON (wrong wiring).
- Not connecting the earth wire.
- Using under-rated wires for high-power devices.
- Leaving exposed copper wire outside the terminal.
Applications of Power Board Wiring
- Home Appliances – Fans, TVs, Washing Machines, Refrigerators.
- Kitchen Appliances – Mixers, Induction Cooktops, Microwave Ovens.
- Workshops – Drilling machines, welding machines, grinders.
- IT Offices – Computers, Servers, Printers.
Advanced Power Board Features
- Surge Protection – Protects devices from voltage spikes.
- MCB (Miniature Circuit Breaker) – Cuts off power during overload.
- Smart Controls – WiFi or Bluetooth-enabled switches.
- USB Charging Ports – Direct charging without adapters.
Maintenance of Power Boards
- Check for loose connections every 6 months.
- Clean dust and moisture to prevent short circuits.
- Replace damaged sockets or switches immediately.
- Test the earth connection regularly with a tester.
Frequently Asked Questions (FAQ)
1. Can I wire a power board myself?
Yes, but only if you have basic electrical knowledge. Otherwise, hire a licensed electrician.
2. What wire size should I use for a 16A socket?
Use at least 2.5mm² copper wire for safety.
3. Why is the switch always connected to phase?
Because it ensures the appliance is completely disconnected when OFF.
4. Can one switch control multiple sockets?
Yes, but it’s not recommended for heavy loads. Each high-power socket should have its own switch.
5. How do I know if my wiring is correct?
Use a tester on the socket. The indicator should glow only when the switch is ON.
Conclusion
Power board wiring may look complicated at first, but once you understand the basic principles of phase, neutral, and earth wiring, it becomes simple. By following the correct steps, using the right tools, and adhering to safety standards, you can easily wire a power board for home or office use.
Always remember: safety is more important than convenience. If you are unsure about wiring, hire a professional electrician. A properly wired power board not only ensures smooth functioning of your appliances but also protects you and your family from electrical hazards.